The challenge has but put to the crochet/knit community to capture creative photos of our work. Challenge accepted!
First of all, here are a few tips for capturing good photos of your items:
- Photograph in natural light (no flash) to capture the best and truest color possible
- Backdrops matter...try to capture in a clutter-free environment (I have some pictures with TV remotes in the background, my husband's foot appears in a few and my messy desk, which you will see below).
- Decide the purpose for taking the photo and let it shine through.
- Have some fun and attempt to capture images that tell a story.
Mistake #1: Staging Photos with the Wrong Props
My co-workers made fun of me for this photo! Apparently, not everyone wants to know that I like oatmeal and bagels. Instead of seeing two really cute hats, you see bagels, pens and the mess on my desk.
Success #1: Proper Staging with the Right Prop
After the fun with my oatmeal container, I got to thinking...I'm a crafty person. When this oatmeal runs out, I'm going to cover it in fabric, then it will look better. But, it never would have looked as gorgeous and stylish as this polystyrene head that I found for $6.00 at the beauty supply store. This picture is a success! The hat is chic and stylish and that's exactly what is portrayed through this picture. The perspective, lighting and everything is exactly what I wanted for this displaying this hat.Mistake #2: The Wrong Backdrop and Long Shadows
This photo was taken on my living room floor. There is no personality, the shadows are obvious and the colors don't shine through. And, should you ever have to ask the viewer to "please ignore the dirty carpet"?
Success #2: The Right Backdrop and Proper Lighting
After I reviewed the picture above, I decided that I needed to get creative with these guys. They took many, many hours to complete and I was determined to get good pictures of them! This session took place by a window (natural daylight) and there was a consistent, subtle background that looked fresh and didn't overpower the main subjects. My backdrop? It is a clean sheet covered with my Solomon's Knot Maternity wrap.
Georgina the Bluebird
Georgina is a stately, curious bird.
Cliveton the Pig
How many kids do you know that have a school picture like this?
The Whole Amigurumi Rainbow
Isn't this how family portraits usually end up?
With someone trying to hide (Wal the Fish),
half the family looking at camera #1
while one person (Ro) is looking at camera #2?
With someone trying to hide (Wal the Fish),
half the family looking at camera #1
while one person (Ro) is looking at camera #2?
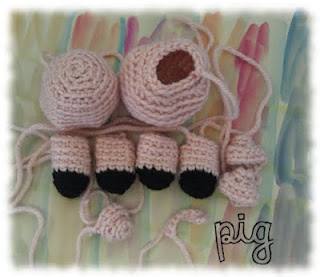
Capturing WIP's (Work in Progress)
Don't drop the ball when you capturing WIP's. Obviously, you are taking the picture for a purpose. Decide what is your purpose in taking the picture and then try to capture that when the picture is snapped. If your goal is to say, "Hey! Look what I'm working on!" Then, make the picture interesting. Take a look at this picture of a monkey knitting a sweater.Success #3: The photo portrays it's purpose
The goal was to show how much work goes into creating each little amigurumi critter. Having each piece laid out on a piece of paper helps. When I originally posted the picture of the pig, I counted the pieces and named them one by one.
NOTE: The artwork in the background is something my son painted for me with a gift he received. I love using his artwork in my photos.


I don't think you missed the mark at all - I love this!
ReplyDeleteThis is a great post full of hints and things to remember. Thanks!
ReplyDeleteGreat tips, I am so going to look for one of those poly heads, awesome prop!
ReplyDeleteVery on-topic! Thanks for taking the time to put this together. Good tips!
ReplyDeleteThank you for your kind comments.
ReplyDelete