 |
| Cartoon Courtesy of What the Duck |

Showing posts with label Photography Tips. Show all posts
Showing posts with label Photography Tips. Show all posts
Wednesday, March 27, 2013
4 Keys to Unlocking Your Photography Potential


Tuesday, March 12, 2013
Free Crochet Pattern: Pot of Gold Amigurumi

St. Patrick's Day Pot of Gold
The inspiration for my owl came from St. Patrick's Day. My sister was a St. Patrick's Day baby. She passed away nearly 6 years ago, so creating this tiny owl was therapy for me dealing with her upcoming birthday. What is St. Patrick's Day without leprechauns and dreaming of a pot of gold at the end of the rainbow? This lucky little owl found the pot of gold at the end of the rainbow.
Materials
Size "F" Crochet Hook
Worsted Weight Yarn in Black
Worsted Weight Yarn in Gold (I used Vanna's Choice - Mustard.)
Yarn needle
Optional: A small amount of polyfil or other stuffing.

The Pot
Ch 2
Round 1: 6 sc in 2nd ch from hook (6)
Round 2: 2 sc in ea st around (12)
Round 3: *2 sc, sc* around (18)
Round 4-8: sc around (18)
Bind off leaving a long tail for sewing.
Using a yarn needle, loosely weave the tail in/out a couple rows below the top of the pot (as pictured above). This will be pulled tight after stuffing the pot with coins.
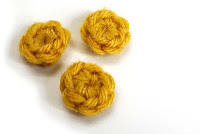 A Single Coin
Ch 2, 6 sc in 2nd ch from hook. Join to 1st chain with the Invisible Join. 
Bind off leaving a short tail.
Tie a knot using the starting tail and ending tail.
Once securely knotted, cut tails.
A Chain of Gold Coins (Optional)
*This is optional. You could crochet several individual pieces of gold instead of creating a chain of attached coins.
*Continue working where you left off. Ch 2, 6 sc in 2nd ch from hook. Sl st to first sc.
After the last coin, bind off leaving a long tail for sewing.
Continue creating a string of coins as long as you would like. I ended with six coins.

Assembling the Pieces
Stuff the pot with the chain of gold coins. You can also use yarn scraps or traditional stuffing if you would like.
Wrap the chain of coins around the outer brim of the pot and slightly taller than the pot. This gives the illusion that the coins are spilling over. Use the tail from the golden chain to secure the coins in place. You can take some of the single coins and stuff them in areas that seem empty.
Last, pull the Black yarn tail around the pot to give it a bit of shaping. Tie a knot and stuff the tail inside the base.

And there you have a beautiful pot of gold.
Wednesday, September 12, 2012

Tuesday, April 24, 2012
3KCBWDAY2: Creatively Capturing Items
The challenge has but put to the crochet/knit community to capture creative photos of our work. Challenge accepted!

First of all, here are a few tips for capturing good photos of your items:
- Photograph in natural light (no flash) to capture the best and truest color possible
- Backdrops matter...try to capture in a clutter-free environment (I have some pictures with TV remotes in the background, my husband's foot appears in a few and my messy desk, which you will see below).
- Decide the purpose for taking the photo and let it shine through.
- Have some fun and attempt to capture images that tell a story.
Mistake #1: Staging Photos with the Wrong Props
My co-workers made fun of me for this photo! Apparently, not everyone wants to know that I like oatmeal and bagels. Instead of seeing two really cute hats, you see bagels, pens and the mess on my desk.

Success #1: Proper Staging with the Right Prop
After the fun with my oatmeal container, I got to thinking...I'm a crafty person. When this oatmeal runs out, I'm going to cover it in fabric, then it will look better. But, it never would have looked as gorgeous and stylish as this polystyrene head that I found for $6.00 at the beauty supply store. This picture is a success! The hat is chic and stylish and that's exactly what is portrayed through this picture. The perspective, lighting and everything is exactly what I wanted for this displaying this hat.
Mistake #2: The Wrong Backdrop and Long Shadows
This photo was taken on my living room floor. There is no personality, the shadows are obvious and the colors don't shine through. And, should you ever have to ask the viewer to "please ignore the dirty carpet"?

Success #2: The Right Backdrop and Proper Lighting
After I reviewed the picture above, I decided that I needed to get creative with these guys. They took many, many hours to complete and I was determined to get good pictures of them! This session took place by a window (natural daylight) and there was a consistent, subtle background that looked fresh and didn't overpower the main subjects. My backdrop? It is a clean sheet covered with my Solomon's Knot Maternity wrap.
Georgina the Bluebird

Georgina is a stately, curious bird.
Cliveton the Pig

How many kids do you know that have a school picture like this?
The Whole Amigurumi Rainbow

Isn't this how family portraits usually end up?
With someone trying to hide (Wal the Fish),
half the family looking at camera #1
while one person (Ro) is looking at camera #2?
With someone trying to hide (Wal the Fish),
half the family looking at camera #1
while one person (Ro) is looking at camera #2?
Capturing WIP's (Work in Progress)
Don't drop the ball when you capturing WIP's. Obviously, you are taking the picture for a purpose. Decide what is your purpose in taking the picture and then try to capture that when the picture is snapped. If your goal is to say, "Hey! Look what I'm working on!" Then, make the picture interesting. Take a look at this picture of a monkey knitting a sweater.Success #3: The photo portrays it's purpose
The goal was to show how much work goes into creating each little amigurumi critter. Having each piece laid out on a piece of paper helps. When I originally posted the picture of the pig, I counted the pieces and named them one by one.

NOTE: The artwork in the background is something my son painted for me with a gift he received. I love using his artwork in my photos.

Subscribe to:
Posts (Atom)
