Showing posts with label Tutorial. Show all posts

Thursday, March 27, 2014

How to Make Any Color of Animal Eyes

Supplies Needed:

Clear Animal Eyes
Nail Polish
Keep polish remover and a cotton ball nearby to clean accidents right away.

Tuesday, January 7, 2014

3 Steps to an Invisible Join

If you are like me (a bit of a perfectionist and slightly OCD), then you will love this technique for creating an invisible join when working in the round. The invisible join mimics the "V" look of a regular stitch so that it blends in and you can't see the beginning or end of a round. I use this on all of my hats and amigurumi pieces. 

3 Steps to an Invisible Finish

I'll teach you how to do it in three easy steps!

This replaces the slip stitch normally done at the end of your project.


Step 1 - Cut the yarn tail

Cut the yarn and pull the final loop so that the tail comes completely through. Thread the tail onto a yarn needle so that it looks like the picture below. The length of your tail will be based on the pattern. If the pattern says leave a long tail for sewing, then cut a long tail. If the instructions are to weave in ends, then you can leave a shorter tail.


Step 2 - Mimicking the Front Half of the V-Stitch 

Insert the yarn needle (front to back) through the first stitch in the round. This is the stitch where you would have normally completed the slip stitch.

This step creates the front loop of the Invisible Join.

Step 3 - Mimicking the Back Half of the V-Stitch

Insert the yarn needle from front-to-back into the final stitch of the round. You will go down through the middle space and go under the back loop.
This step creates the back loop of the Invisible Join.
And this is what it looks like:


When to Use This Technique

I use this technique for every edge piece. I used it is here on the tiny coins for my pot of gold. Don't those gold coins look perfect? 


I also use this technique on hats, beanies and photography props so that there isn't an obvious end to the project. I like the edges to be uniform.


Saturday, December 14, 2013

How to Crochet a Sweater for Your Elf


Does your family have an Elf on the Shelf? Do you know what he wants more than anything else? He wants a sweater of his own! You know they get tired of wearing the same old thing all the time. And, if you are having an ugly Christmas sweater party, then the elf should also be dressed in style. He does listen to your conversations throughout the day, you know!

Inspiration for this Project

After seeing Monsters University earlier this year, I graphed the Oozma Kappa design and thought I might make my 4 year old son a hat using the chart. But, he chose Minions instead. So, this chart has been saved on my computer until I realized that it was the perfect height/width for a sweater for Lloyd!

Supplies Used

Red Heart Soft Yarn - Green
Caron Simply Soft - Darker Green
Caron Simply Soft - Yellow
Size "E" crochet hook

Pattern

With Dark Green: Ch 32, join with slip stitch to first chain using caution to not twist the joining chain. (Note: Gauge is not included in this pattern. This round should be slightly loose around your elf.)
Round 1: ch 1, sc in same stitch as ch1 and in each stitch around, join with slip stitch.
Round 2: With Green, ch 1, sc in same stitch as ch 1 and in each stitch around, join with slip stitch.
Round 3-12: ch 1, sc in same stitch as ch 1 and in next 16 stitches, **Refer to chart for color changes.**, sc in last stitch, join with slip stitch.
Round 13: ch 1, sc in same stitch as ch 1 and in each stitch around, join with slip stitch.
Round 14: ch 1, sc in same stitch as ch 1 and in each stitch around, join with slip stitch.

To work the first sleeve:
Slip Stitch in next two stitches, ch 1 & turn work.
Row 1: sc in same stitch as ch1 and in the next 5 stitches, ch 1, turn.
Row 2-11: sc in each stitch across, ch 1, turn (6)
Fasten off leaving a long tail for sewing.

To work the other sleeve:
Join yarn 2 stitches from the center of the arm pit area by doing a chain 1.
Row 1: sc in same stitch as ch1 and in the next 5 stitches, ch 1, turn.
Row 2-11: sc in each stitch across, ch 1, turn (6)
Fasten off leaving a long tail for sewing.


Sewing the Sweater Onto the Elf

I had to get creating with designing the sweater because my elf's hands are still stuck together. Which, in my opinion, adds to wonder of how this magical little elf got that sweater on. 


Slip the sweater onto the elf from the bottom.
Use the long tail to wipstitch the sleeves closed starting at the cuff and working to his shoulder. Tuck the yarn tail into his back. The kids will never know it's there! Repeat this process for the other side.
Make sure the elf's collar covers up the loose ends at the top. 

The Finished Project

Here is Lloyd, the next member of Oozma Kappa at Monsters University along with one of his favorite scare monsters as a baby! The Baby Sulley pattern is available for free on Ravelry from A Morning Cup of Jo!

Free Crochet Pattern for the Oozma Kappa Sweater from Monsters U for your Elf on the Shelf

Psssst!

If working from the chart scares you, then don't use it! The sweater would be just as fun in a variegated yarn, self-string yarn or it's a great scrap yarn project using whatever odds and ends you have around! Just have fun with it! 

Thursday, August 1, 2013

A Beginner's Guide to Interlock Crochet

If you are ready for a challenging crochet project, then this is it! I am a quick learner who loves a challenge! Rarely do I find a project or technique that makes me feel like giving up. Is it really worth it to stick it out and conquer this thing? YES! My goal here is to save you all the beginner's mistakes and teach you everything you'll need to know to complete your first Interlocking Crochet project.

What is Interlocking Crochet?

Interlocking Crochet is a method of crocheting two layers of filet-style mesh sheets in such a way that the two layers are woven together to create a single, reversible fabric. Depending on the stitch used, it can create the same pattern on the front and back or two completely separate designs on the front and back.

Wednesday, March 27, 2013

4 Keys to Unlocking Your Photography Potential


4 Keys to Unlocking Your Photography Potential
Cartoon Courtesy of What the Duck

With a few keys under your belt, you can achieve professional photos no matter what camera you use!

Key #1: Great Lighting Matters More Than the Camera

Tuesday, September 25, 2012

Becoming More Productive with Producteev.com

Becoming more Productive with Producteev.com #NiccuppCrochet


Do you ever look at your order list and feel overwhelmed and confused? Then you wonder how on earth will you ever get everything done? And, really, what is your wait time right now? Is it two weeks? Three weeks? Maybe even four or five weeks?

Tuesday, September 18, 2012

Kool-Aid Yarn Dyeing with Helpful Tips


Supplies Needed: Natural Fiber, Dye, Water and Vinegar #NiccuppCrochet

You are probably curious about dyeing your own yarn, but probably scared. Let me relieve some of the pressure for you. It's actually really easy and hardly any work at all.

Tuesday, August 21, 2012

How Do You Keep Track of Patterns?


Stacey of Fresh Stitches had a great blog post about how to read PDF files. I would highly recommend her post before reading on. I am a total geek. I loved her post and want to take it a step further into Geekhood.  What I want to talk about is organizing the pdf files, accessing them from anywhere and also keeping track of which patterns you own.

Here is what I will round up for you today:
  1. How I keep track of what I own
  2. Pattern Storage
  3. Accessing Patterns

Tuesday, July 24, 2012

Simple Headband Flowers - Pintastic Tuesday 07

I have so much fun browsing Pinterest and drawing inspiration from what others have done. Seriously, is there anything better than Pinterest to actually make me want to clean my house and have fun doing it?

This week's crafty inspiration was originally pinned on my Hair Clips / Headbands board.

The Project:

Source: Pinterest | Original Source: iCandy Handmade
I love, love, love to make photography props and all things baby! I don't have a baby girl of my very own. As much as I would love to have another baby, my love says we are done. So, I have two boys at home and I'm the only lady in the house. So, if I can't have any more babies of my own, then I can at least make beautiful things for babies and live vicariously through my little prop shop, right?


Tuesday, June 12, 2012

Pintastic Tuesday 01

We all find awesome ideas on pinterest, right? How many have you actually tried? Some things I pin, I fully intend to make it right away. Other things are just good ideas for later. I thought it would be fun to create a fun new them for Tuesdays.

Introducing....

For my first pinterest success story, I wanted to show you this awesome tutorial for Charmed Pencil Pouches. There is an amazing (!!!) tutorial from Sweet Verbena that helped me conquer my fear of zippers. The tutorial is perfect if you have that same fear. I assure you that this simple project will help you conquer zippers.

The Project:

Source: Sweet Verbena

Pinterest Success:


I ended up putting my entire button collection in the brown flowery pouch and it is completely full!!! You know what that means? The next time I see a basket full of buttons for $.25 each, I can easily have the self-control to pass on by, because I do not have room for them in my little pouch.

The gray pouch with the geometric pattern is the new home of all of my crochet hooks. It fit all of my hooks including the massively huge size "Q" hook.

Have you made anything fun from Pinterest this week? Join in and spread the fun by leaving your link below! NOTE: The text you type in "Your Name" will display representing your link. It says a comment is required. You aren't required to comment on this post, but please comment on at least one blog post you visit.

Mister Linky's Magical Widgets


Simply Linked


InLinkz

Tuesday, June 5, 2012

Pacifier Clip - Tutorial


I wanted to create a version of a pacifier clip that is cute, doesn't have buttons (choking hazard) and one that can have cute little interchangeable designs. I have a few baby gifts to make and I plan on gifting these.

Disclaimer: I give you full permission to use my method in any way you choose (personal or for selling). 

Please read the designer's release regarding the appliques that you use. They may or may not grant permission to sell items using their product. Please keep this in mind and be respectful of the designer!

Supplies:

  1. Small amount of Cotton yarn for the base of the clip. I used I Love This Cotton in White and Lily's Cotton in Natural.
  2. An applique (or two or three)
  3. Crochet Hook (use size suggested on yarn label)
  4. Suspender Clip (As of 6/5/2012, these are $1.99 for a package of 2 clips at Hobby Lobby)

Instructions:

The ribbon is created in sections rather than rows.


Section 1: Ch 15 and join with slip stitch to first chain.
Section 2: Chain 40
Section 3: Slip Stitch to 15th chain from hook.
Section 4: Single Crochet* in the next 25 stitches to get back to the beginning loop. Slip stitch to base stitch of the beginning loop and bind off. Weave in loose ends.

*Single Crochet in section 4 can be replaced by hdc or dc.  Here are examples of what the base of the pacifier clip will look like using different basic stitches:


Next, grab your applique!
I added a few chain stitches across the back of the applique to give the clip something to hold on to. I did not sew the applique onto the main section of the pacifier clip. There are loops of equal size on both ends of base ribbon.


  1. Insert one of the loops through back of applique
  2. Pull loop over the tail
  3. Tuck the loop under the post of ch stitches on the applique and tighten so that it looks like Picture 3.
  4. Place the applique and suspender clip face down. Slip the loop through the clip from bottom to top. The loop will come up on the backside of the clip.
  5. Slip the loop over the suspender clip to the front of the clip.
  6. Tighten the loop. (Between picture 6 & 7, I slid the loop down to the 2nd bar.)
  7. Take the other end of the loop and insert through the ring on the pacifier.
  8. Work the loop over the applique and length of the ribbon.
  9. Tighten and wear. 
Here is a close-up of the completed Butterfly Pacifier Clip.


And whip up a pair of barefoot sandals with matching appliques for sweet little set.

Barefoot Sandals Designed by The Misadventures of Handmade

For more applique ideas, check out my Crochet-Applique board at Pinterest!

Appliques Featured in this Post were designed by:

     Calleigh's Clips & Crochet Creations

Monday, April 23, 2012

How to: Using Paintbrushes in the Gimp (Part 2 of 2)


In Part 1: How to Create a Paintbrush in the Gimp, I showed you how to take an image and turn it into a paintbrush.

In Part 2, I will teach you how to use paintbrushes by showing you how I created the "Tutorial" button above.  Do not let the number of steps below overwhelm you. It really is quite simple and just a few mouse-clicks. I am known for over-explaining things.  If you have a question, please ask! I love to share knowledge!

Here are the supplies you need:

1. The GIMP (free download link)
2. A couple of paintbrushes (refer to Part 1: How to Create a Paintbrush in the Gimp)
3. Your Font choices


Step 1: Create a new file in the Gimp. Any size will do, but 600 px wide X 400 px high is a decent size.

Step 2: Select the Paintbrush tool from the Toolbox.

  • Select the shape from the "Brushes" dialog box.
  • Select the scale by increasing and decreasing the slider on the scale.

Step 3: Click & release on the workspace where you want the image to stay. You can try to center it perfectly (or you have an option for cheating in Step 4).


Step 4 (optional): To center it perfectly, we will crop the image around the shape.

  • With the "Fuzzy Border Tool" selected, click the white background space
  • From the Select menu, click "Invert" 
  • From the Image menu, click "Crop to Selection"


Step 5: Repeat Steps 2 and 3 for each additional image you want to add


Step 6: Add your text


At this point, the only thing left is to save it. Go to the "File" Menu, click "Save a Copy".

Choose .jpg as the file type.


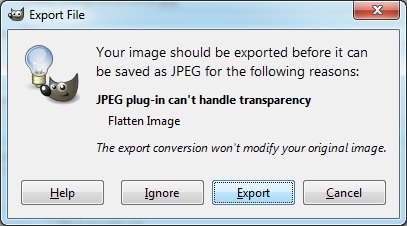
Click "Export" if the screen below pops up:


When this screen pops up, click "Save":


And, now you have a beautifully designed image!


Credits:


A huge thank you to Sugarflies Designs for allowing me to use her images in this tutorial.  She designed both the whimsical outline shape and the cute, little owl.

Check out her beautiful designs in her her Etsy store and become a fan on Facebook.


Saturday, April 21, 2012

How to Create a Paintbrush in The Gimp (Part 1 of 2)


You should learn how to create and use Toolbrushes in the Gimp because it will make your life so much easier! Don't believe me? The "Tutorial" image above was created using only two tools and just a couple mouse clicks: Text & Paintbrush. The outline shape is a paintbrush. The owl is a paintbrush. A few mouse clicks and the rest is text. Cool, right?

So, what is a paintbrush? The way that I am using the "paintbrush" tool is like a stamp...click once, release and the image stays. Click through for a demonstration of how to use the paintbrush.

I am going to create a paintbrush (aka stamp) of Fritz.
Picture of Fritz
  1. Open the file in The Gimp (Free Download link)
  2. Click the "Fuzzy Select Tool":

  3. Click on the white area (background).
    TIP: When creating a brush, you should only select the white areas you want to get rid. For example, I do not want to get rid of the skin on Fritz's face:

  4. Invert the Selection by clicking on the Select Menu --> Invert:

  5. Press the Delete button on your keyboard and the background changes to a gray checkerboard (gray background = transparent background):

  6. Save the file as a .gbr file in the brushes folder:
  7. NOTE: If you are a Windows user, it is located here:
    C:/Users/YOUR NAME HERE/.gimp-2.6/brushes

Congratulations! You now have a paintbrush. Read the follow-up tutorial on how to use the paint brush.


Related Posts Plugin for WordPress, Blogger...