Showing posts with label crochet. Show all posts

Thursday, March 27, 2014

How to Make Any Color of Animal Eyes

Supplies Needed:

Clear Animal Eyes
Nail Polish
Keep polish remover and a cotton ball nearby to clean accidents right away.

Wednesday, March 26, 2014

The Velorum Scarf - Free Crochet Pattern

This scarf was 100% inspired by my recent scarf swap partner whose Ravelry ID contains the word astronomy and her color choices were cosmic! I looked to the night sky for a name representing the V-stitch used in this super easy scarf pattern! There was only on name I had ever heard of: VelorumIf you are geeky like me, then you'll recognize the name from Star Wars:
I call for a vote of no confidence in Chancellor Velorum.
Aside from that, Velorum is a star system in the constellation Vela.

Monday, February 24, 2014

Wrap-Up of Ravellenics 2014


I participated in my first Ravellenic games this year! Ravellenics coincides with the Olympics and it's a time where fiber artists challenge themselves to complete projects and compete on teams.

I was on the team TreeHouse Crochet and started out the games by not pushing myself too hard. I coasted through the first 4 or 5 projects and chose one project that took an entire week of focus to complete. 

Aerial Unwind

This was by far the easiest competition that I participated in. I was making a scarf for a swap and ended up not having enough wool to complete the scarf. 


I used every inch of yarn, then had to frog it (unwind it). It was really hard to unravel that many hours of work, but it was also incredibly freeing! I may start unwinding a little more regularly in the future. 


Hat Halfpipe

I watched a lot of Olympics on NBC simply because I was competing in Ravellenics. I caught the Women's Halfpipe event and was so sad to hear the story of Sarah Burke. Her story and the coverage of this event was truly inspiring and, even now, I continue reflecting on the comments of her parents in the interview. They are truly amazing parents whom I aspire to be like.

 Owen Hat - Made by Niccupp Crochet - Designed by Loops of Love

Toy Tobogganing

Of course this was the most fun event of all! Who doesn't smile when they make fun toys for kids? We have named this dog puppet, Scout, since that's the name of the dog in our church's Sunday School lessons. The kids love Scout! I get to teach Sunday school next week and can't wait to use him with the kids. 

Free pattern from Stitch 11

WIPs Dancing

Intended for a charity collection seeking 70 animals for children in a women's shelter, Owen the Monkey quickly fell through the cracks last fall. I had finished crocheting all the pieces (including his head/body and facial features not shown in this fun photo) last October, but her remained in pieces until now.


 And here he is all finished next to his favorite monkey friend, Peach.


Scarf Super-G and Mitten Moguls

Do you remember that scarf above where I ran out of yarn? I remade it creating a pattern as I went and here's the finished scarf.


Since this scarf is a little more open-work, I ended up having enough wool remaining to barely squeeze out this matching pair of fingerless gloves.


Sweaterboard Cross

This is the area where I challenged myself. I never make garments. I typically refuse requests to make dresses, clothing and blankets. These projects take so much time and just aren't worth it. But, I decided that I would make a sweater once for myself. The total project cost for this sweater was $20.00 and this includes the price of the yarn and the price of the pattern.


I need to get better photos of the sweater. It's called the Simply Elegant Sweater designed by Jenny King. It's a gorgeous, loose-fitting design that I truly believe would look great on any body type. I wore it to church today and it got a lot of positive feedback. I don't know why, but I'm always a little embarrassed when things I make get that much attention.

This sweater weighs close to 20 oz. and used between 950-1,000 yards of Caron Simply Soft yarn.


Conclusion of Ravellenics 2014

I thoroughly enjoyed the games! I really pushed myself to make the sweater and I'm so happy to have actually finished it in time. I can't believe that I fit in SIX projects aside from this one. I'm completely amazed at what we can accomplish when we push ourselves to reach our goals.

My team, Treehouse Crochet, had a competition running based on projects completed during the games and the total yardage of our projects. But, I'm satisfied in earning the Ravthlete badge! I'll be wearing it proudly as my Ravatar for many weeks to come. 


Friday, February 14, 2014

Crocheting for Valentine's Day

Here are just a few of the projects (and a small amount of candy-making) that I have done in preparation for Valentine's Day. Enjoy! All of the patterns linked in this post are free crochet patterns! Be sure you check them out. XO

Cross Your Heart Coffee Cozy

This was my first Valentine's project. I made it in January while my mom was in surgery. It works up so fast and makes a great teacher's gift!

This didn't quite fit on my cup, but it was the perfect size for a wrist warmer. I'm keeping it for myself and need to make a second one for the other hand. This is the perfect project for those scrap yarns!

 Cross Your Heart Coffee Cozy
Cross Your Heart Coffee Cozy

Tuesday, January 28, 2014

The 30-Minute Cowl - Free Crochet Pattern

My husband's grandmother is a piano teacher and she requested a short, warm scarf with a button that she could wear with her winter coat. That's how this design was born. I wanted something simple, but elegant. I wasn't necessarily going for a quick project, but I was able to crank these cowls/scarves out in record speed!


The maroon version was made with two strands of Red Heart With Love. 

Upper right was made with Lion Brand Homespun Thick & Quick.

Lower right was made with two strands of Lion Brand Jiffy.

I call this the 30-minute Cowl, because the short version works up super quick since you work into the chain spaces and not directly into the stitches. :-)

Tuesday, January 7, 2014

3 Steps to an Invisible Join

If you are like me (a bit of a perfectionist and slightly OCD), then you will love this technique for creating an invisible join when working in the round. The invisible join mimics the "V" look of a regular stitch so that it blends in and you can't see the beginning or end of a round. I use this on all of my hats and amigurumi pieces. 

3 Steps to an Invisible Finish

I'll teach you how to do it in three easy steps!

This replaces the slip stitch normally done at the end of your project.


Step 1 - Cut the yarn tail

Cut the yarn and pull the final loop so that the tail comes completely through. Thread the tail onto a yarn needle so that it looks like the picture below. The length of your tail will be based on the pattern. If the pattern says leave a long tail for sewing, then cut a long tail. If the instructions are to weave in ends, then you can leave a shorter tail.


Step 2 - Mimicking the Front Half of the V-Stitch 

Insert the yarn needle (front to back) through the first stitch in the round. This is the stitch where you would have normally completed the slip stitch.

This step creates the front loop of the Invisible Join.

Step 3 - Mimicking the Back Half of the V-Stitch

Insert the yarn needle from front-to-back into the final stitch of the round. You will go down through the middle space and go under the back loop.
This step creates the back loop of the Invisible Join.
And this is what it looks like:


When to Use This Technique

I use this technique for every edge piece. I used it is here on the tiny coins for my pot of gold. Don't those gold coins look perfect? 


I also use this technique on hats, beanies and photography props so that there isn't an obvious end to the project. I like the edges to be uniform.


Saturday, December 14, 2013

How to Crochet a Sweater for Your Elf


Does your family have an Elf on the Shelf? Do you know what he wants more than anything else? He wants a sweater of his own! You know they get tired of wearing the same old thing all the time. And, if you are having an ugly Christmas sweater party, then the elf should also be dressed in style. He does listen to your conversations throughout the day, you know!

Inspiration for this Project

After seeing Monsters University earlier this year, I graphed the Oozma Kappa design and thought I might make my 4 year old son a hat using the chart. But, he chose Minions instead. So, this chart has been saved on my computer until I realized that it was the perfect height/width for a sweater for Lloyd!

Supplies Used

Red Heart Soft Yarn - Green
Caron Simply Soft - Darker Green
Caron Simply Soft - Yellow
Size "E" crochet hook

Pattern

With Dark Green: Ch 32, join with slip stitch to first chain using caution to not twist the joining chain. (Note: Gauge is not included in this pattern. This round should be slightly loose around your elf.)
Round 1: ch 1, sc in same stitch as ch1 and in each stitch around, join with slip stitch.
Round 2: With Green, ch 1, sc in same stitch as ch 1 and in each stitch around, join with slip stitch.
Round 3-12: ch 1, sc in same stitch as ch 1 and in next 16 stitches, **Refer to chart for color changes.**, sc in last stitch, join with slip stitch.
Round 13: ch 1, sc in same stitch as ch 1 and in each stitch around, join with slip stitch.
Round 14: ch 1, sc in same stitch as ch 1 and in each stitch around, join with slip stitch.

To work the first sleeve:
Slip Stitch in next two stitches, ch 1 & turn work.
Row 1: sc in same stitch as ch1 and in the next 5 stitches, ch 1, turn.
Row 2-11: sc in each stitch across, ch 1, turn (6)
Fasten off leaving a long tail for sewing.

To work the other sleeve:
Join yarn 2 stitches from the center of the arm pit area by doing a chain 1.
Row 1: sc in same stitch as ch1 and in the next 5 stitches, ch 1, turn.
Row 2-11: sc in each stitch across, ch 1, turn (6)
Fasten off leaving a long tail for sewing.


Sewing the Sweater Onto the Elf

I had to get creating with designing the sweater because my elf's hands are still stuck together. Which, in my opinion, adds to wonder of how this magical little elf got that sweater on. 


Slip the sweater onto the elf from the bottom.
Use the long tail to wipstitch the sleeves closed starting at the cuff and working to his shoulder. Tuck the yarn tail into his back. The kids will never know it's there! Repeat this process for the other side.
Make sure the elf's collar covers up the loose ends at the top. 

The Finished Project

Here is Lloyd, the next member of Oozma Kappa at Monsters University along with one of his favorite scare monsters as a baby! The Baby Sulley pattern is available for free on Ravelry from A Morning Cup of Jo!

Free Crochet Pattern for the Oozma Kappa Sweater from Monsters U for your Elf on the Shelf

Psssst!

If working from the chart scares you, then don't use it! The sweater would be just as fun in a variegated yarn, self-string yarn or it's a great scrap yarn project using whatever odds and ends you have around! Just have fun with it! 

Friday, August 23, 2013

FO Friday: Assembling the Minions

My younger son turned 4 last week and started preschool this past Monday. He demanded that I make him a Minion backpack for preschool. I was hesitant and we talked him into buying a camouflage dinosaur backpack instead. I kind-of felt bad for not making him the backpack, so I made him a Minion hat.


While I was working on it, he kept asking if it was his Minion backpack. And, I kept reminding him about his really cool dinosaur backpack. He wouldn't relent. A couple of weeks ago, I was driving to work when an idea came to me on how I could make the backpack.

So, I took about 5 minutes and drew out a couple of sketches:

Friday, August 2, 2013

Thursday, August 1, 2013

A Beginner's Guide to Interlock Crochet

If you are ready for a challenging crochet project, then this is it! I am a quick learner who loves a challenge! Rarely do I find a project or technique that makes me feel like giving up. Is it really worth it to stick it out and conquer this thing? YES! My goal here is to save you all the beginner's mistakes and teach you everything you'll need to know to complete your first Interlocking Crochet project.

What is Interlocking Crochet?

Interlocking Crochet is a method of crocheting two layers of filet-style mesh sheets in such a way that the two layers are woven together to create a single, reversible fabric. Depending on the stitch used, it can create the same pattern on the front and back or two completely separate designs on the front and back.

Friday, July 12, 2013

Finishing Off Friday - an Elephant and Yoda

Before I share my projects, I have to share this photo. Wednesday marked 6 years since my sister passed on from this world. My brother-in-law has been faithful to take a dozen roses to my sister every year on certain dates. When my husband, sons, mom and I arrived at the cemetery Wednesday night, her dozen roses were sitting on top of the tombstone. My niece took a balloon to her mom that said, "Miss You".


Don't cry for us. Just pray that God continues to comfort our family and the two precious kids she left behind.

Wednesday, July 10, 2013

How to Use Your Crochet Stitch Markers for Knitting


I made these monster stitch markers for myself a few months ago. The problem is I am multi-craftual and I needed some stitch markers for knitting a pair of socks. But, I didn't want to break out the clay to create a whole new set of stitch markers.

Friday, July 5, 2013

How I Kept Myself From Being Successful

I was asked by someone local, "Are you still crocheting?" Eek...The fact that someone asked that question is a problem. I crochet all the time. So, why would a local person have to ask me if I'm still crocheting?

I had to search myself and realized that I am keeping success away by hiding my pieces from the world. It sent me on a search to figure out what misconceptions do I have that are keeping me from being successful? And, in the end, it resulted in the fact that I am neglecting the platforms I have on which to promote my finished pieces to the world of people who may end up buying them.


Happy Independence Day with a Dose of Crochet

Yesterday was Independence Day in the U.S. I started off my day by testing the Addison Headband pattern for the amazing Calleigh's Clips and Crochet Creations. I made the headband in red, white and blue and wore it to the parade.

Monday, July 1, 2013

June Wrap-up

I finished several projects during the month of June. There's something for Duck Dynasty fans, Tinkerbell fans, monster lovers, hunters and children of the 80s. 

I had to bump the Cabbage Patch Kids hat to the front. Aren't these the sweetest things? I have two hats ready-to-ship in newborn/0-3 month sizes. These are $30 for newborn and range in price up to $40 for adult size. Contact me if you are interested in ordering or follow my Etsy shop, because I plan on listing the two I have already finished if no one claims them soon. 
One of the three Cabbage Patch Kids hats I made in June.
 Next up is this Tinkerbell-inspired doll using the A Doll Like Me e-book containing 4 doll patterns from FreshStitches. She turned out exactly as I planned, though I must admit that I spent 3 hours (at least) just trying to get her lips right. I finally glued on some lips and moved on. Do you know a little girl who would love her? She is $75.00 and is still waiting to find a new home.

Princess Ballerina

I love monsters. I LOVE monsters! Love, love, love them! And, I just recently realized how much cuter they are in tiny size. Look how tiny this gal is! She is wearing the Monopoly hat game piece. It fits her perfectly and just shows how teeny tiny she really is.


Ro the Tiny Monster

And, here she is with her mom who is also quite small with her beautiful flower eyes.


Tiny Toothie & Tiny Ro

And, now we get into the things for the Duck Dynasty fans.

I improvised this little camouflage deer hat.

 
Deer Camo Beanie

This awesome pattern for Drake the Mallard Duck is from the amazingly talented, HollieJolly Designs. I think Duck Dynasty fans will love this guy!

Drake the Mallard Duck


And, last, but not least, a customer requested something with a Cincinnati Reds theme. there are links below the picture where you can find the patterns for these items. I improvised the "C" for Cincinnati and cut it out of felt and sewed it on. It's a true baseball cap with the little hole in the back. And it comes with a crisp pair of white baseball shorts. I cannot wait for this baby to arrive so I can see him wearing this outfit. I might faint when I see the photo.
Baseball Cap and Baseball Pants

What I Learned this month

I learned a fancy new stitch called The Loop Stitch. It's used in the Cabbage Patch Kids wigs and is securely attaches the loops so they will not come out.

And, I got lots of practice working with felt and attaching it to my pieces. This came from the eyes/lips of the Tinkerbell-inspired doll and the Cincinnati Reds hat.

Plans for next month

I have all of my projects queued in Ravelry and I plan on working through all of the patterns I purchased by the end of the year. I have 6 months to do it, so that averages out to about 7.2 projects per month! Wish me luck!

I am continuing the yarn stash project where I focus on using up yarn from my stash. It's amazing just how much yarn I have and how much of it was bought without a purpose. For the projects featured in this post, I purchased only one new skein of yarn (yellow) to finish off the pig tails on the Cabbage Patch hats.


Wednesday, May 29, 2013

Creating Beauty with Ugly Yarn

I have been working really hard this year to eliminate some of the unwanted yarn from my stash. Originally, I picked some yarns out of my stash that I wasn't exactly fond of:

My original idea of a destash challenge box

A few beautiful projects came out of the challenge box. But when I pulled all my yarn from every nook and cranny, I realized this box was not an accurate depiction of my actual challenge yarns.

What Does an Ugly Yarn Look Like?

Well, it's easier to show it than explain it. I tend to take pretty photos of pretty yarn. And, sloppy, discombobulated photos like this when working with a slightly hideous yarn.

Need Help with your ugly yarn? Every skein has a purpose.

You can just look at that photo and tell that I'm not having fun on the project, right?

But, every skein of yarn can be redeemed! I truly believe that even ugly yarn can be turned into beautiful art. That photo above is the WIP photo of this cowl below. I honestly love this cowl and wore it for days after I finished it.

Creating Beauty with Ugly Yarn
Chunky Braided Cowl

And then there was this yarn...

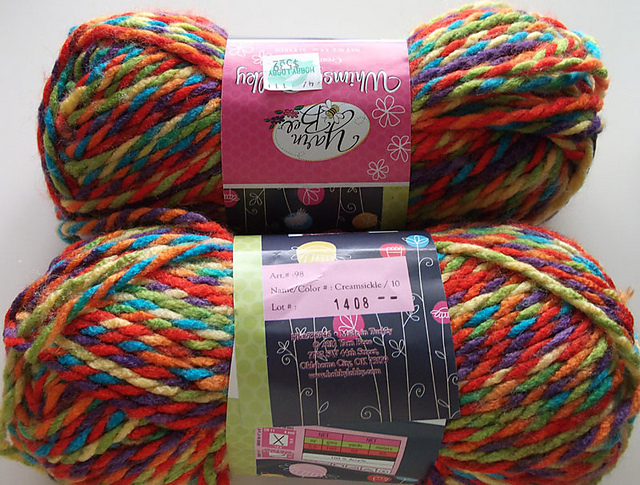
Yarn Bee Whimsy Bulky in Creamsickle made into a huge monster!
Image source: TooManyBooks (Ravelry)
Generally speaking, I like earth-tones and muted colors. Why did I buy two skeins of Yarn Bee Whimsy Bulky in the colorway Creamsickle?  I'm really not sure. I bet that I bought it during a retail therapy session where my therapist (that'd be me) thought some rainbowy fiber might cheer me up. I should have gone for a Creamsickle ice cream instead.

But, if I had gotten ice cream, then I wouldn't have this Alien/Monster! 

Creating Beauty with Ugly Yarn by Niccupp Crochet
Ruffle Alien

Those two skeins sat in my stash for over a year before I finally tackled them. I definitely think I won the battle with that yarn and turned it into exactly what it needed to be. My younger son (he's 3) and I both love this guy so much! 

please do not pin photos of my son!

I thought I was going to sell him. Maybe I will at some point, but for now, he keeps watch over the new plushies who are waiting for their forever homes.

A few finished ami's - all FreshStitches designs


Beauty Belongs to the Creator

I hope this inspires you to look at your yarn a little differently. What can you create with that ugly yarn you have been avoiding?


Friday, May 3, 2013

Introducing....BERT-MERN

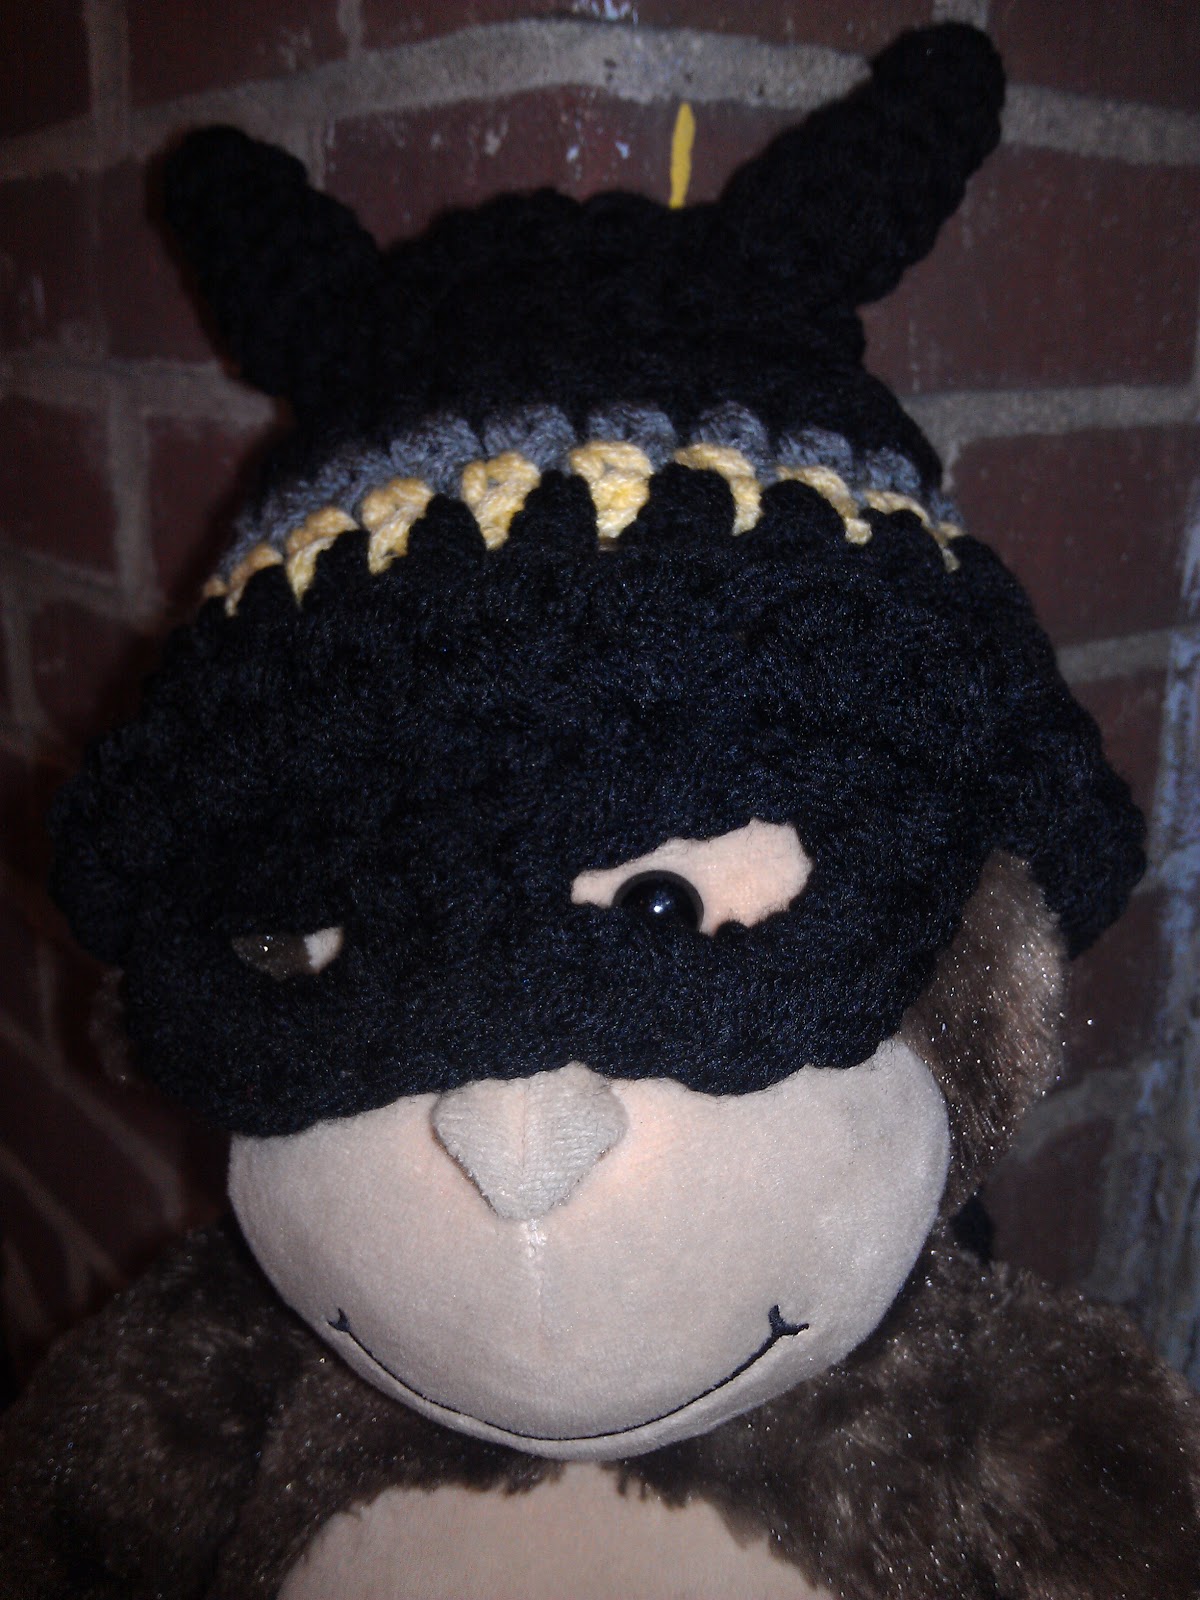
BatBaby Hat & Mask Designed by CalleighsClips
BatBaby hat and Mask being modeled by Miss Peach, my 3 year old's Build-a-Bear Monkey.

I have made several cape sets designed by the uber talented Calleigh's Clips and Crochet Creations, but I have to say that this Bat Baby set may be very high on my list of favorites from her! I tend to stay away from licensed/trademarked characters unless someone asks, which was the case here. A friend asked if I could make anything Superhero and I was immediately drawn to BatMan. 


BatBaby Hat, Cape and mask designed by CalleighsClips


BatMan is a registered logo and this cape is really for a Batbaby and not 100% batman. The actual logo is not included in the pattern as that would be a violation. It's easy enough to consult with Google and trace, draw or free-stitch your own batman symbol onto the patch.

Isn't this cape set just the cutest thing? It looks even more awesome being modeled by Miss Peach, my three year old's reward for using the potty!!!

Want to make your own superhero without buying a pattern? Check out CCCC's free cape & mask pattern!

Related Posts Plugin for WordPress, Blogger...