Showing posts with label amigurumi. Show all posts

Thursday, March 27, 2014

How to Make Any Color of Animal Eyes

Supplies Needed:

Clear Animal Eyes
Nail Polish
Keep polish remover and a cotton ball nearby to clean accidents right away.

Friday, August 23, 2013

FO Friday: Assembling the Minions

My younger son turned 4 last week and started preschool this past Monday. He demanded that I make him a Minion backpack for preschool. I was hesitant and we talked him into buying a camouflage dinosaur backpack instead. I kind-of felt bad for not making him the backpack, so I made him a Minion hat.


While I was working on it, he kept asking if it was his Minion backpack. And, I kept reminding him about his really cool dinosaur backpack. He wouldn't relent. A couple of weeks ago, I was driving to work when an idea came to me on how I could make the backpack.

So, I took about 5 minutes and drew out a couple of sketches:

Friday, July 12, 2013

Finishing Off Friday - an Elephant and Yoda

Before I share my projects, I have to share this photo. Wednesday marked 6 years since my sister passed on from this world. My brother-in-law has been faithful to take a dozen roses to my sister every year on certain dates. When my husband, sons, mom and I arrived at the cemetery Wednesday night, her dozen roses were sitting on top of the tombstone. My niece took a balloon to her mom that said, "Miss You".


Don't cry for us. Just pray that God continues to comfort our family and the two precious kids she left behind.

Friday, July 5, 2013

How I Kept Myself From Being Successful

I was asked by someone local, "Are you still crocheting?" Eek...The fact that someone asked that question is a problem. I crochet all the time. So, why would a local person have to ask me if I'm still crocheting?

I had to search myself and realized that I am keeping success away by hiding my pieces from the world. It sent me on a search to figure out what misconceptions do I have that are keeping me from being successful? And, in the end, it resulted in the fact that I am neglecting the platforms I have on which to promote my finished pieces to the world of people who may end up buying them.


Monday, July 1, 2013

June Wrap-up

I finished several projects during the month of June. There's something for Duck Dynasty fans, Tinkerbell fans, monster lovers, hunters and children of the 80s. 

I had to bump the Cabbage Patch Kids hat to the front. Aren't these the sweetest things? I have two hats ready-to-ship in newborn/0-3 month sizes. These are $30 for newborn and range in price up to $40 for adult size. Contact me if you are interested in ordering or follow my Etsy shop, because I plan on listing the two I have already finished if no one claims them soon. 
One of the three Cabbage Patch Kids hats I made in June.
 Next up is this Tinkerbell-inspired doll using the A Doll Like Me e-book containing 4 doll patterns from FreshStitches. She turned out exactly as I planned, though I must admit that I spent 3 hours (at least) just trying to get her lips right. I finally glued on some lips and moved on. Do you know a little girl who would love her? She is $75.00 and is still waiting to find a new home.

Princess Ballerina

I love monsters. I LOVE monsters! Love, love, love them! And, I just recently realized how much cuter they are in tiny size. Look how tiny this gal is! She is wearing the Monopoly hat game piece. It fits her perfectly and just shows how teeny tiny she really is.


Ro the Tiny Monster

And, here she is with her mom who is also quite small with her beautiful flower eyes.


Tiny Toothie & Tiny Ro

And, now we get into the things for the Duck Dynasty fans.

I improvised this little camouflage deer hat.

 
Deer Camo Beanie

This awesome pattern for Drake the Mallard Duck is from the amazingly talented, HollieJolly Designs. I think Duck Dynasty fans will love this guy!

Drake the Mallard Duck


And, last, but not least, a customer requested something with a Cincinnati Reds theme. there are links below the picture where you can find the patterns for these items. I improvised the "C" for Cincinnati and cut it out of felt and sewed it on. It's a true baseball cap with the little hole in the back. And it comes with a crisp pair of white baseball shorts. I cannot wait for this baby to arrive so I can see him wearing this outfit. I might faint when I see the photo.
Baseball Cap and Baseball Pants

What I Learned this month

I learned a fancy new stitch called The Loop Stitch. It's used in the Cabbage Patch Kids wigs and is securely attaches the loops so they will not come out.

And, I got lots of practice working with felt and attaching it to my pieces. This came from the eyes/lips of the Tinkerbell-inspired doll and the Cincinnati Reds hat.

Plans for next month

I have all of my projects queued in Ravelry and I plan on working through all of the patterns I purchased by the end of the year. I have 6 months to do it, so that averages out to about 7.2 projects per month! Wish me luck!

I am continuing the yarn stash project where I focus on using up yarn from my stash. It's amazing just how much yarn I have and how much of it was bought without a purpose. For the projects featured in this post, I purchased only one new skein of yarn (yellow) to finish off the pig tails on the Cabbage Patch hats.


Wednesday, May 29, 2013

Creating Beauty with Ugly Yarn

I have been working really hard this year to eliminate some of the unwanted yarn from my stash. Originally, I picked some yarns out of my stash that I wasn't exactly fond of:

My original idea of a destash challenge box

A few beautiful projects came out of the challenge box. But when I pulled all my yarn from every nook and cranny, I realized this box was not an accurate depiction of my actual challenge yarns.

What Does an Ugly Yarn Look Like?

Well, it's easier to show it than explain it. I tend to take pretty photos of pretty yarn. And, sloppy, discombobulated photos like this when working with a slightly hideous yarn.

Need Help with your ugly yarn? Every skein has a purpose.

You can just look at that photo and tell that I'm not having fun on the project, right?

But, every skein of yarn can be redeemed! I truly believe that even ugly yarn can be turned into beautiful art. That photo above is the WIP photo of this cowl below. I honestly love this cowl and wore it for days after I finished it.

Creating Beauty with Ugly Yarn
Chunky Braided Cowl

And then there was this yarn...

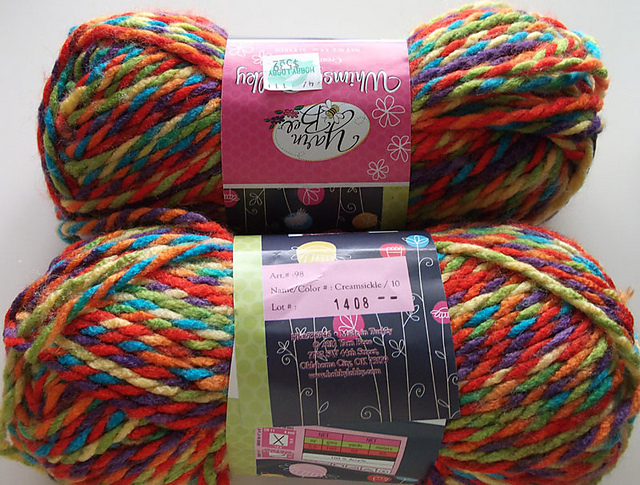
Yarn Bee Whimsy Bulky in Creamsickle made into a huge monster!
Image source: TooManyBooks (Ravelry)
Generally speaking, I like earth-tones and muted colors. Why did I buy two skeins of Yarn Bee Whimsy Bulky in the colorway Creamsickle?  I'm really not sure. I bet that I bought it during a retail therapy session where my therapist (that'd be me) thought some rainbowy fiber might cheer me up. I should have gone for a Creamsickle ice cream instead.

But, if I had gotten ice cream, then I wouldn't have this Alien/Monster! 

Creating Beauty with Ugly Yarn by Niccupp Crochet
Ruffle Alien

Those two skeins sat in my stash for over a year before I finally tackled them. I definitely think I won the battle with that yarn and turned it into exactly what it needed to be. My younger son (he's 3) and I both love this guy so much! 

please do not pin photos of my son!

I thought I was going to sell him. Maybe I will at some point, but for now, he keeps watch over the new plushies who are waiting for their forever homes.

A few finished ami's - all FreshStitches designs


Beauty Belongs to the Creator

I hope this inspires you to look at your yarn a little differently. What can you create with that ugly yarn you have been avoiding?


Tuesday, March 12, 2013

Free Crochet Pattern: Pot of Gold Amigurumi

Just in time for St. Patrick's Day - Crochet your own pot of gold. #freePattern #crochet

Nel the Tiny Owl is a pattern by FreshStitches. Stacey's style and adorable amigurumi designs will leave you wanting more ami! Her patterns are easy to understand and includes photos for each step along the way. If you make this little guy, you may run into trouble attaching his eyes through all those layers of fabric. Check out this easy solution I came up with.

St. Patrick's Day Pot of Gold

The inspiration for my owl came from St. Patrick's Day. My sister was a St. Patrick's Day baby. She passed away nearly 6 years ago, so creating this tiny owl was therapy for me dealing with her upcoming birthday. What is St. Patrick's Day without leprechauns and dreaming of a pot of gold at the end of the rainbow? This lucky little owl found the pot of gold at the end of the rainbow.


Materials

Size "F" Crochet Hook
Worsted Weight Yarn in Black
Worsted Weight Yarn in Gold (I used Vanna's Choice - Mustard.)
Yarn needle
Optional: A small amount of polyfil or other stuffing.
{Niccupp Crochet} - Crochet your own pot of gold. #freePattern #crochet

The Pot


Ch 2
Round 1: 6 sc in 2nd ch from hook (6)
Round 2: 2 sc in ea st around (12)
Round 3: *2 sc, sc* around (18)
Round 4-8: sc around (18)
Bind off leaving a long tail for sewing.

Using a yarn needle, loosely weave the tail in/out a couple rows below the top of the pot (as pictured above). This will be pulled tight after stuffing the pot with coins.
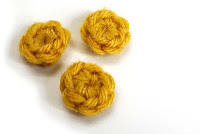
{Niccupp Crochet} Crocheted Coins A Single Coin

Ch 2, 6 sc in 2nd ch from hook. Join to 1st chain with the Invisible Join
Bind off leaving a short tail.
Tie a knot using the starting tail and ending tail. 
Once securely knotted, cut tails.


A Chain of Gold Coins (Optional)

*This is optional. You could crochet several individual pieces of gold instead of creating a chain of attached coins.

Ch 2, 6 sc in 2nd ch from hook. Sl st to first sc, do not cut yarn.
*Continue working where you left off. Ch 2, 6 sc in 2nd ch from hook. Sl st to first sc.
After the last coin, bind off leaving a long tail for sewing.
Continue creating a string of coins as long as you would like. I ended with six coins.

Crocheting a chain of coins #FreePattern #Crochet

Assembling the Pieces


Stuff the pot with the chain of gold coins. You can also use yarn scraps or traditional stuffing if you would like.

Wrap the chain of coins around the outer brim of the pot and slightly taller than the pot. This gives the illusion that the coins are spilling over.  Use the tail from the golden chain to secure the coins in place.  You can take some of the single coins and stuff them in areas that seem empty.

Last, pull the Black yarn tail around the pot to give it a bit of shaping. Tie a knot and stuff the tail inside the base.


Crochet your own pot of gold for St. Patrick's Day. #freePattern #crochet

And there you have a beautiful pot of gold.

Friday, December 21, 2012

Crocheting for Newtown, CT

Helping Sandy Hook Heal through Crochet: Amigurumi, beanies and squares
This is a purely informational post and a quick round-up of three opportunities I have seen on ways to donate your crochet talents to help the community of Newtown, CT.

Saturday, October 13, 2012

Sir Dragon (Day 3)

Today was a fun family day at Brown County State Park hiking trails and we bought a little fudge and taffy at a candy shop in nearby Nashville, IN.

Tonight I worked on Sir Dragon for an hour or so after my guys were in bed. I have made lots of progress on his head and I am now working on his body. So far, I have probably spent around 3 hours on him. All of his pieces are complete and waiting to be attached to his body.

He will probably be much easier to identify the next time you see him.


Friday, October 12, 2012

Sir Dragon (Day 2)

I spent a few more hours on Sir Dragon today. Here is what he looks like now....


Thursday, October 11, 2012

The Making of Sir Dragon....Day 1


During the month of September, I went on a Dragon Adventure using the Choose Your Own Dragon Adventure pattern from FreshStitches. You can read the whole dragon tale on Ravelry.

This entry still makes me laugh a little:

Wednesday, April 11, 2012

Amigurumi Fun

The flu bug hit our house with a vengeance this year! For two weeks, I could not work on anything. It was a great time to re-focus and spend time with my family.

Now that the germs are gone, I have been busy making a set of Amigurumi animals (and Ro the Monster, who is just awesome!). These were designed by the fabulous Stacey Trock of FreshStitches. I purchased her e-book of Rainbow Amigurumi. The pattern is great! Very easy to follow and pretty good instructions on how to attach the pieces together. I would suggest that anyone interested in working on amigurumi read her Beginner Amigurumi handbook. It is a valuable resource!

Amigurumi is a lot of work, but it is worth it! The end result is lovable little creatures that will last a long, long time. The pack has 7 patterns in all. I have finished these:


What do you call the opposite of dissection? Hmm...I have no clue. But, Mr. Froggie will be happy to know that he will soon be put together better than Humpty Dumpty. The picture above shows these guys in all their glory. Well, here's the down and dirty pic showing just how much goes into these little guys. Making each piece takes time. Assembling each piece together takes time. Falling in love with the completed creature...instantaneous!


Mr. Frog - 4 legs to attach to the body; 2 eyes to attach to his head; then, attach head and body. Easy enough, eh?


Bluebird - still in the process of forming his body, but you can see the wings & beak are ready.


Mr. Pig - He had better be pretty doggone cute when I am finished. He requires the most assembly of all the animals with FOUR legs, ONE tail, TWO ears, ONE snout AND attaching his head/body. Wowzer!

These guys are awesomely cute and totally worth the work. When you ask how much they are and I tell you, maybe now you will understand why the cost is so high. Even at $5.00 an hour, most people could not afford these and that's ok. :)
Related Posts Plugin for WordPress, Blogger...