Showing posts with label free pattern. Show all posts

Wednesday, March 26, 2014

The Velorum Scarf - Free Crochet Pattern

This scarf was 100% inspired by my recent scarf swap partner whose Ravelry ID contains the word astronomy and her color choices were cosmic! I looked to the night sky for a name representing the V-stitch used in this super easy scarf pattern! There was only on name I had ever heard of: Velorum. If you are geeky like me, then you'll recognize the name from Star Wars:
I call for a vote of no confidence in Chancellor Velorum.
Aside from that, Velorum is a star system in the constellation Vela.

Tuesday, January 28, 2014

The 30-Minute Cowl - Free Crochet Pattern

My husband's grandmother is a piano teacher and she requested a short, warm scarf with a button that she could wear with her winter coat. That's how this design was born. I wanted something simple, but elegant. I wasn't necessarily going for a quick project, but I was able to crank these cowls/scarves out in record speed!


The maroon version was made with two strands of Red Heart With Love. 

Upper right was made with Lion Brand Homespun Thick & Quick.

Lower right was made with two strands of Lion Brand Jiffy.

I call this the 30-minute Cowl, because the short version works up super quick since you work into the chain spaces and not directly into the stitches. :-)

Thursday, September 12, 2013

Rainbow Fishing Game - Free Pattern

A local customer contacted me to make a fishing game set for her grandson. She referred to one of my pins on Pinterest that turned out to not have a pattern with it (a second reminder to be careful what you pin). I agreed to make a fishing game in my own style and that's what you'll find below. The idea for a fishing game is not original, but the pattern is my own design.

Supplies

Worsted Weight Yarn - 7 Colors needed for the rainbow, a lip color, plus 6 fish colors
Small amount of Crochet Thread (I used Bernat's Handicrafter Cotton Thread Size 5 in Gray)
Size "B" 2.25 mm crochet hook
Size "G" 4.25 mm crochet hook
Small Amount of stuffing
Sew-on Craft Eyes (optional)
6 Washers (1/2" or smaller with a hole large enough to fit your hook through)
Super Strong Magnets - I used one magnet 8 mm wide by 3 mm high
Tree Branch or Dowel Rod for Fishing pole

Friday, August 2, 2013

Thursday, March 14, 2013

Preemie Owl Hat - Free Crochet Pattern

Do we really need another owl pattern?? Truth be told....ummm, no.

But, of the oodles and oodles of patterns available, none of them are super quick to make for donating. I set out to make my own bird/owl that is super cute without all the fuss.

The Dainty Daisy has organized an ongoing collection for hats of all sizes for Rosie's Cozies specifically focused on hats for NICU babies.
She has received about 100 hats towards the goal of 500 hats in March. 
We have to help!  If you have just an hour, you can make a preemie hat. So, please make a few. It will bring love and comfort to what could be a dark and lonely day for these families. Here are just a few of the hats I am mailing next week. The free Sock Monkey pattern is available here. The pattern for the owl hat is posted below. I hope you will participate.

Free Pattern for Preemie Owl Hat #RosiesCozies

Materials

Worsted Weight Acrylic Yarn - Stay away from wool as babies may be allergic.
Size "I" Crochet Hook

Tuesday, March 12, 2013

Free Crochet Pattern: Pot of Gold Amigurumi

Just in time for St. Patrick's Day - Crochet your own pot of gold. #freePattern #crochet

Nel the Tiny Owl is a pattern by FreshStitches. Stacey's style and adorable amigurumi designs will leave you wanting more ami! Her patterns are easy to understand and includes photos for each step along the way. If you make this little guy, you may run into trouble attaching his eyes through all those layers of fabric. Check out this easy solution I came up with.

St. Patrick's Day Pot of Gold

The inspiration for my owl came from St. Patrick's Day. My sister was a St. Patrick's Day baby. She passed away nearly 6 years ago, so creating this tiny owl was therapy for me dealing with her upcoming birthday. What is St. Patrick's Day without leprechauns and dreaming of a pot of gold at the end of the rainbow? This lucky little owl found the pot of gold at the end of the rainbow.


Materials

Size "F" Crochet Hook
Worsted Weight Yarn in Black
Worsted Weight Yarn in Gold (I used Vanna's Choice - Mustard.)
Yarn needle
Optional: A small amount of polyfil or other stuffing.
{Niccupp Crochet} - Crochet your own pot of gold. #freePattern #crochet

The Pot


Ch 2
Round 1: 6 sc in 2nd ch from hook (6)
Round 2: 2 sc in ea st around (12)
Round 3: *2 sc, sc* around (18)
Round 4-8: sc around (18)
Bind off leaving a long tail for sewing.

Using a yarn needle, loosely weave the tail in/out a couple rows below the top of the pot (as pictured above). This will be pulled tight after stuffing the pot with coins.
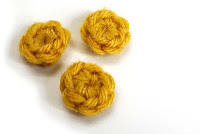
{Niccupp Crochet} Crocheted Coins A Single Coin

Ch 2, 6 sc in 2nd ch from hook. Join to 1st chain with the Invisible Join. 
Bind off leaving a short tail.
Tie a knot using the starting tail and ending tail. 
Once securely knotted, cut tails.


A Chain of Gold Coins (Optional)

*This is optional. You could crochet several individual pieces of gold instead of creating a chain of attached coins.

Ch 2, 6 sc in 2nd ch from hook. Sl st to first sc, do not cut yarn.
*Continue working where you left off. Ch 2, 6 sc in 2nd ch from hook. Sl st to first sc.
After the last coin, bind off leaving a long tail for sewing.
Continue creating a string of coins as long as you would like. I ended with six coins.

Crocheting a chain of coins #FreePattern #Crochet

Assembling the Pieces


Stuff the pot with the chain of gold coins. You can also use yarn scraps or traditional stuffing if you would like.

Wrap the chain of coins around the outer brim of the pot and slightly taller than the pot. This gives the illusion that the coins are spilling over.  Use the tail from the golden chain to secure the coins in place.  You can take some of the single coins and stuff them in areas that seem empty.

Last, pull the Black yarn tail around the pot to give it a bit of shaping. Tie a knot and stuff the tail inside the base.


Crochet your own pot of gold for St. Patrick's Day. #freePattern #crochet

And there you have a beautiful pot of gold.

Monday, February 18, 2013

Textured Mini-Blanket Free Pattern


I barely used any of the textured fuzzy/furry yarn to create the hat above. It left me with nearly an entire skein. I am harnessing my yarn stash and created a challenge box with some of my more unique yarns. This was certainly a challenge yarn and it made it into the challenge box.

#YarnHoarderPrevention #YarnStashProject #TugboatYarning

I took the leftover ball of yarn and created a Textured Mini Blanket and sent it to Farren Carlson Photography this week as a "Thank you" gift. She has given me lots of amazing photos and has been a faithful customer. I hope she likes the mini-blanket and can use it soon.

Free Pattern for Textured Mini-Blanket Photography Prop

Textured Mini-Blanket

Supplies

Size "N" Crochet hook

Pattern

Ch 27. DC in 2nd ch from hook and each stitch across, ch 1, turn. (25)
Row 2 through end: DC in each st across until piece reaches desired length.

I  made mine into a square approx. 15" x 15". 

Gauge is not important on this project, just make sure that you get a nice-looking fabric.


Join the Yarn Stash Project!


If you are a fiber addict and need some help, you are not alone! Don't let those in denial keep you from becoming free from the tangled web known as your stash. Get help today!
  • Join the Yarn Stash Project
  • Join the Ravelry Team for encouragement
  • Instagram your destash using hashtags #YarnHoarderPrevention or #YarnStashProject2013
  • Follow me on Instagram - username: niccupp

Friday, January 18, 2013

Sock Monkey - Free Preemie Pattern for Rosie's Cozies


Simple and Free Sock monkey Pattern

My friend Elisabeth at Calleigh's Clips and Crochet Creations created a new Preemie Tiger pattern for Rosie's Cozies. I would have never known about this project if it hadn't been for her. She inspired me to come up with my own design to fit a Zooish theme. 

The Dainty Daisy
Rosie's Cozies is a project created to honor the families of those fighting for the lives of their children in the NICU. 

Rosanna DeVries was born at 23 weeks and after two rollercoaster weeks, the Lord chose to take her home.  This project is meant to honor little Rosie's life and the family who fought for her.

Thursday, September 27, 2012

It's the Great Pumpkin

Fall is upon us and that means partaking in some of our favorite traditions. My family will be watching the Great Pupmkin before too long along with, "You're Not Elected Charlie Brown". So, with fall upon us and everyone proudbly displaying their pumpkin hats, I had to join the fun and create my own version.

Pumpkin Hat by Niccupp Crochet

Tuesday, September 18, 2012

Kool-Aid Yarn Dyeing with Helpful Tips


Supplies Needed: Natural Fiber, Dye, Water and Vinegar #NiccuppCrochet

You are probably curious about dyeing your own yarn, but probably scared. Let me relieve some of the pressure for you. It's actually really easy and hardly any work at all.

Tuesday, June 5, 2012

Pacifier Clip - Tutorial


I wanted to create a version of a pacifier clip that is cute, doesn't have buttons (choking hazard) and one that can have cute little interchangeable designs. I have a few baby gifts to make and I plan on gifting these.

Disclaimer: I give you full permission to use my method in any way you choose (personal or for selling). 

Please read the designer's release regarding the appliques that you use. They may or may not grant permission to sell items using their product. Please keep this in mind and be respectful of the designer!

Supplies:

  1. Small amount of Cotton yarn for the base of the clip. I used I Love This Cotton in White and Lily's Cotton in Natural.
  2. An applique (or two or three)
  3. Crochet Hook (use size suggested on yarn label)
  4. Suspender Clip (As of 6/5/2012, these are $1.99 for a package of 2 clips at Hobby Lobby)

Instructions:

The ribbon is created in sections rather than rows.


Section 1: Ch 15 and join with slip stitch to first chain.
Section 2: Chain 40
Section 3: Slip Stitch to 15th chain from hook.
Section 4: Single Crochet* in the next 25 stitches to get back to the beginning loop. Slip stitch to base stitch of the beginning loop and bind off. Weave in loose ends.

*Single Crochet in section 4 can be replaced by hdc or dc.  Here are examples of what the base of the pacifier clip will look like using different basic stitches:


Next, grab your applique!
I added a few chain stitches across the back of the applique to give the clip something to hold on to. I did not sew the applique onto the main section of the pacifier clip. There are loops of equal size on both ends of base ribbon.


  1. Insert one of the loops through back of applique
  2. Pull loop over the tail
  3. Tuck the loop under the post of ch stitches on the applique and tighten so that it looks like Picture 3.
  4. Place the applique and suspender clip face down. Slip the loop through the clip from bottom to top. The loop will come up on the backside of the clip.
  5. Slip the loop over the suspender clip to the front of the clip.
  6. Tighten the loop. (Between picture 6 & 7, I slid the loop down to the 2nd bar.)
  7. Take the other end of the loop and insert through the ring on the pacifier.
  8. Work the loop over the applique and length of the ribbon.
  9. Tighten and wear. 
Here is a close-up of the completed Butterfly Pacifier Clip.


And whip up a pair of barefoot sandals with matching appliques for sweet little set.

Barefoot Sandals Designed by The Misadventures of Handmade

For more applique ideas, check out my Crochet-Applique board at Pinterest!

Appliques Featured in this Post were designed by:

     Calleigh's Clips & Crochet Creations

Monday, November 28, 2011

One Hour Fingerless Gloves

This is my very first original pattern, so please leave comments and feel free to post pictures on my Facebook Wall. The pattern is also on Ravelry as a free download. I would love to see what you come up with!


Materials
Size P Hook
40 yards Super Bulky
I used ½ skein of Lion
Brand Hometown USA.

Pattern
Ch 12 & Join with slip stitch
Round 1-3: Ch 2, HDC 11, Join with slip stitch
*For longer gloves: Repeat Ch 2, HDC 11, Join with
slip stitch until desired length is reached. For the pink gloves, there we no extra rows. For the grayish gloves, I did one extra row.
Round 4-5: Ch 2, HDC to end, turn
Round 6: Ch 2, HDC to end, Join to first stitch with a
slip stitch
Round 7: Ch 2, HDC around, Join with slip stitch

For Left Hand:
Round 8: Do not Ch 2. HDC into same stitch as slip
stitch, HDC 7 and slip stitch into next stitch, Turn.
Round 9: Sc in next stitch, then sc 8 stitches and slip
stitch at end. Bind off and weave in ends.

For Right Hand:
Round 8: Turn, HDC into next stitch, then HDC 7
stitches and slip stitch into next stitch. Turn.
Round 9: Sc in next stitch, then sc 8 stitches and slip
stitch at end. Bind off and weave in ends.

Notes: I used Lion Brand Hometown USA, but any Super Bulky yarn (or two strands of Worsted Weight) should work.
Related Posts Plugin for WordPress, Blogger...